
If you are a Twitch user and want to enter the world of streamers, you will need to stand out to gain followers . There are many ways to achieve this, but a great way is to make your channel look different and professional.
Right here is where the famous overlays or panels for Twitch come into the scene, since these allow many transmission channels to stand out above the rest and, as a result, the user manages to attract a greater number of followers.
What are overlays or panels on Twitch?
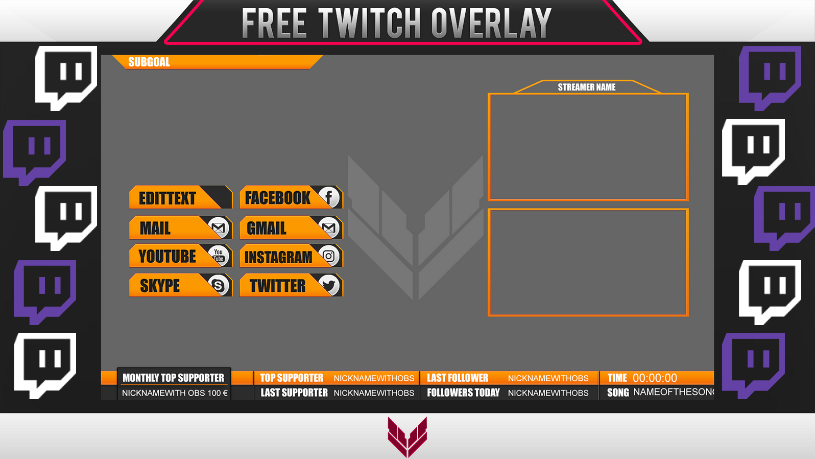
An overlay or panel is an image that is placed on the top layer of an image or video. This image can be designed in editing programs such as Photoshop to create it according to our tastes. However, these images can also be found completely free online and modified later.
With this in mind, on Twitch overlays or panels are frames that are placed on a layer above the video you are transmitting. In this way, you can make your channel more attractive and customize it as you want according to your taste or style.
How to get unique Twitch overlays?
In order to give a unique look to your Twitch overlays, you’ll have to hire professional designers who can get the desired overlays for you. Especially for streamers who want to get the best out of Twitch and those who aspire to earn money from streaming, it becomes necessary to stand out from others by giving unique look to their overlays.
Fiverr is one such website where you can hire professional designers who can do it cheaply and quickly. The best thing about those designers is that they provide you unlimited revisions until you get satisfied. In simple words, your satisfaction is guaranteed. Given below are few experienced professional designers who can help you kick start your streaming journey with nice, unique and cool animated Twitch overlays.
How to get free Twitch overlays?
If you want to personalize your Twitch streaming and you don’t have a sufficient budget or you just don’t want to invest in this type of resource yet, you can choose to get them for free from web pages that offer downloading of these or applications that support streaming through them. using their own panels. Other applications allow you to customize or edit the panels based on a template, so you must place the elements you want. Given below are few websites and applications that can help you out:
(i) Player.me
Player.me is a platform that is specially designed for gamers and offers live streaming services , editing, recording, personalizing, sharing and watching other users’ broadcasts . The most important thing is that it has an overlays editing section where you can find a wide variety of styles.
The best thing is that it also allows you to create your own panel from predetermined templates to which you can add the features or widgets you need and modify them in position, size or color.
PROS
✔ It has more than 100 default templates.
✔ It offers a desktop application.
✔ Internal tests can be performed to verify that the widgets are running correctly, such as simulating a donation or new subscription.
CONS
❌ It does not recognize a large number of games.
❌ Extension management is a bit tricky.
Player.me is a totally free option to edit and download Twitch panels. What I like most is that once the overlay design is finished, the program helps the user by providing complete instructions for integrating the panel into broadcasts.
And although it is not compatible with certain titles, you can use it with the most popular : Fortnite, GTAV, PUBG, Overwatch or League of Legends, among others.
(ii) Zerging
The German Zerging platform offers various resources to users who want to stream. In this sense, on your website you will find a fairly extensive variety of graphics available to use in editing different overlays.
One of the most used is Cyan, which has a light blue design that is very modern and attractive. But it is not the only one, but on the page you can choose from a large collection of overlays, widgets and complete packs so that you can edit the panel to your liking and completely renew the appearance of your broadcasts.
PROS
✔ All overlay styles are different.
✔ It has unlimited and free graphics.
✔ It offers complete packages, i.e. unique files with different elements for the panel.
✔ Overlays also work for YouTube
CONS
❌ Their designs can be somewhat simple for those more demanding users.
Zerging does not charge to use its platform or streaming resources , and although most of its designs and packs are generic, it also has some exclusive ones for certain games that work wonderfully.
(iii) Stream Play Graphics
Without a doubt, if you want to give a professional touch to your Twitch channel and stand out in the streaming world, Stream Play Graphics should be your choice. The platform has a wide repertoire of graphics with very elaborate designs, being able to download complete packs, overlays, offline banners or panels for alerts.
Of course, in Stream Play Graphics you will not be able to retransmit your games, as they simply operate as a graphics download website for Twitch. Most packs are paid, although the website also offers free options if your budget is limited.
PROS
✔ The panel comes in a file where you can change the color and text.
✔ Unique and personalized graphics.
✔ Overlays work on any streaming software like OBS, YouTube or Mixer.
CONS
❌ You have to pay to download the premium packages.
❌ It cannot be transmitted on your platform.
Stream Play Graphics gives you the option of being able to request the creation of completely personalized graphics with all the details you want to have on it. Premium packages range from $ 3.99 to $ 19.99.
(iv) Own3dTV
A few years ago, Own3dTV was considered one of the best platforms for streaming video games. However, the website was temporarily closed and returned with a completely renewed design. Streaming is no longer possible but instead focuses on helping streamers succeed in this world.
For this reason, Own3dTV is one of the best options if you want to find a wide variety of graphics and elements to customize the Twitch panels. For this, you can choose premium designs to highlight your channel in the gamer world: complete packs, webcam overlays, profile widgets with the photo, etc. You can filter the results by color or game.
They also have a section for creating avatars and templates, and it also offers articles and instructional videos to guide new gamers to succeed.
PROS
✔ The website design is very good.
✔ It offers a lot of very good level content.
✔ Allows payment through PayPal.
✔ Possibility of making tutorials to learn how to broadcast.
CONS
❌ You have very few free options.
❌ Their prices are somewhat high for beginners.
Despite the fact that Own3dTV has high prices for its packages and graphics, you will be sure that the downloaded content is of a high level and quality. A basic package costs around $49 and a premium package can go up to $81. However, they always have promotions and discounts of up to 40%.
(v) Nerd or Die
Nerd or Die is one of the pages proposed in this list that upload content more frequently, so they are always aware of the latest trends. The website has a free section of Twitch overlays that will completely change the way you view your broadcasts.
Apart from updated content, it also has quite original alert sounds and different custom widgets. Its downloadable content works perfectly with Twitch, although it is also compatible with other programs, such as Facebook, YouTube Gaming or Mixer.
PROS
✔ It offers additional content such as alerts and background sounds.
✔ It also has widgets, panels etc.
✔ The designs are very creative.
CONS
❌ It only offers 8 free overlays.
❌ To have a discount, you must obtain points redeemable through purchases.
Although they do not have as much free content, it is worth noting that their No Man’s Sky package is wonderful. If you want to buy premium items, you should know that their prices vary between $5 and $30.
(vi) Strexm TV
Strexm TV is one of the most comprehensive dashboard pages for Twitch. In its catalog, you will find up to 200 completely free overlays, all of them including alerts and widgets that you can edit: donation indicators, followers, subscribers etc.
Also, although the panels are usually generic, most are created to adapt to specific games, such as Black Ops 4, Overwatch, Battlefield or League of Legends, among others.
PROS
✔ Their templates are categorized by games.
✔ Overlays and different graphic elements can be customized.
✔ It is one of the options with more variety of free packs.
CONS
❌ Its panels are created to work preferably in xSplit and OBS.
❌ Classic OBS software is not 100% Strexm compatible.
The best thing about Strexm TV is that it is totally free, so you won’t have to pay for any of its content. To use Strexm TV you just need to connect it with your Twitch account and choose the panel that you like the most.
How to create Twitch overlay using Photoshop (Step by Step Guide)
What do you think about the idea of creating your own overlays yourself? For those who want to make themselves known in the streamer world, it is best to create your own overlays with unique features, details and graphics . Doing it this way, the channel will have its own identity mark and will be more recognizable by others.
Now, how to create an overlay for Twitch? Although it may seem very complicated, you don’t really need to be a professional designer for it, since there are several simple methods.
Some choose to use Canva, GIMP and even PowerPoint, but a very practical way is to use Photoshop since its editing tools are very useful and the end result is spectacular. Do you want to learn how to do it with Photoshop? Below, I’ll explain all the steps to achieve a basic and functional panel:
Set a guide for placing items
First of all, start by placing a base to guide you and putting the graphics correctly in place. As a basis we mean using an image of the game to which you want to install a custom panel.
To do this, we recommend taking a screenshot of the game and then pasting it into a blank Photoshop document. Remember to configure the screen resolution in the new image of the program to avoid it later being distorted or misplaced.
You can start by designing a bar at the top of the screen. For this, you must do the following:
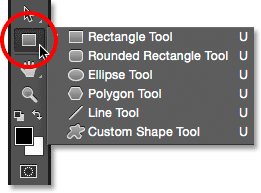
- In the left menu of the program, choose the “Rectangle” tool.
- Then, in the same menu, select the background color.
- Once done, select the rectangle and drag it to the top of the image. You will have already created the bar.
- Now, right-click on the created rectangle and open the “Blending Options” menu.
- Within this menu, search for “Stroke” and configure the width and color of the bar border.
- Press “OK” and choose the layer of the bar.
- With the movement tool, move and place the bar in the appropriate area.
- Lastly, adjust the opacity of the bar by selecting the layer and reducing the opacity until it looks good.
With the top banner finished, you can continue with the bottom banners. You don’t have to start from scratch, just duplicate the top bar and adjust it to the features you need.
So, you can add as many lower bars as you want and with the movement tool you can move and locate them . A smart fact is that if you press “Ctrl” on the keyboard while moving the layer, the movement will be more delicate and precise.
Camera frame
Once done with the banners, now is the time to proceed with the camera frame. In this case, you must proceed as follows:
- Select the “Rectangle” tool and holding the ” Shift ” key creates a perfect box.
- Right-click on the created box and look again for the “Stroke” options in « Blending Options «.
- To put the last layer box, change to “Interior” in the “Position” options .
- In the next step, adjust the color and width you want the frame to be.
- So, so that you only have the frame, change the “Fill” of the layer to 0%.
- Now, with the movement tool, locate the camera where you like the most.
- Finally, you can adjust the size with the “Shift” key pressed and dragging the cursor.
Place the texts
In this step, you have to install the banner texts and the additional ones that you think appropriate. The procedure is given below:
- Use the text tool and place a text box anywhere on the screen.
- In the character menu, select the color and font.
- Write the text you need.
- Now with the movement tool locate the text where you need it.
Easy, right? Also, if you want to personalize the text you can go to the “ Blending Options ” and in « Stroke » you have the possibility to modify the text with adjustments in shadows, opacity or strokes, among other options.
To add the rest of the texts, it is as simple as duplicating the text already made and modifying them and placing them in the areas where you want to have a writing or announcement.
Surely, you want to have your brand visible and further highlight your channel. To place your own logo, you have to locate it and frame it with a rectangle so that it follows the same style of your banners. To do this, you must take into account the steps that we show you below:
- Places the ruler of the program’s tools, which is automatically centered on the screen.
- From “File”, place your logo . This will automatically focus on the ruler.
- Then create a new layer and place it under the logo.
- Just like for banners, create a rectangle around the logo.
- Also, modify the frame to match the banners.
- Join the layers by selecting the frame layer and the logo layer. To do this, hold ” Ctrl ” and right click. Now, select the option “Convert to smart object” .
- Finally, move the logo to where you want it to be and adjust its size if you need to.
To add the logos of social networks, the most practical thing is to opt for icons already created and free trade. To download them, some web pages offer them completely free of charge. Once you have them, you should:
- Open the logo from ” File ” and ” Place “.
- Select the layer and adjust the necessary parameters so that the icon combines with everything already installed. To modify it, you must go to “Stroke” from the “Blending Options” menu .
- Finally, move it to the area of the screen you prefer.
The same procedure applies to all the social media logos that you are going to put. However, to save you steps you can copy the layer style of the one already modified and then paste it in the new icons.
Save the overlay
At this point, our panel will be almost ready. To finish, save the panel created as a Photoshop file first, this will allow you to use it for other games or modify it later. Instead, a PNG file is required to use it .
To do this, you must have a transparent background , which must be put leaving only the layers created or overlapping using the “Eye” option of Photoshop. And now, you can save the file with the .PNG extension to use it in your streams.
How to put panels on Twitch
Whether you’ve downloaded a panel or created it with Photoshop or another program, the last thing you have left is to use it on Twitch. The procedure of placing panels on Twitch is very simple, regardless of the software you use for streaming since they all have an overlay section where you can load the panels you want to use and modify the layers.
In this way, once you have the panel loaded, you must configure the layers so that it is seen correctly. The correct way is to place the game as the bottom layer, the panel as the top layer, and the camera as the middle layer.
I’d love to hear how you got your free animated Twitch stream overlays. Be sure to leave them in the comments!


This post is great! I read your blog on a regular basis and you are always releasing some very nice stuff.
I’ll make sure to share this on my Facebook page and my followers should like this
also. Keep up the great work!